Discoverer 4i Plus Online Help
Release 4.1


Contents

Index

Exporting Data to Other Application Formats

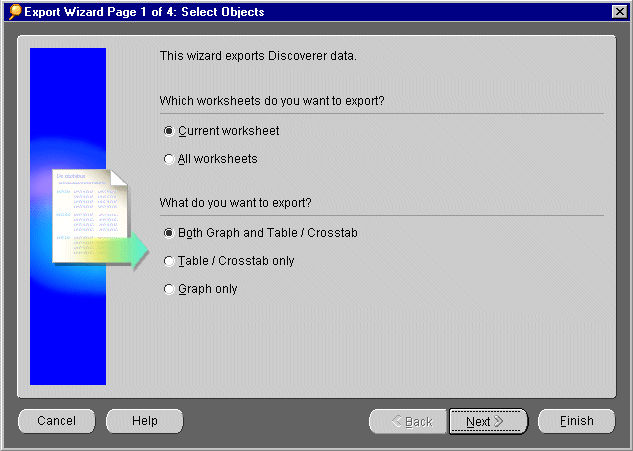
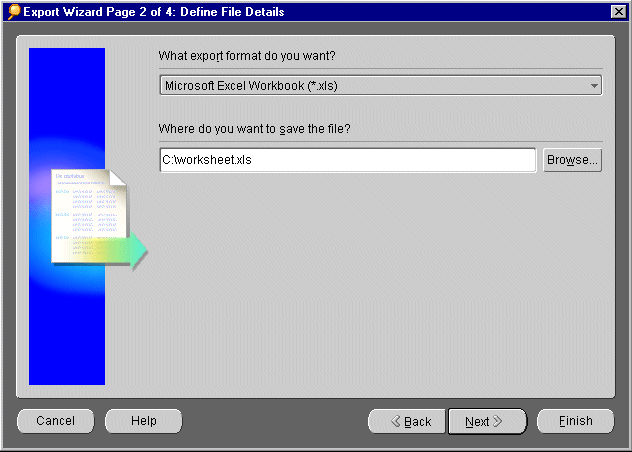
Discoverer provides the Export Wizard to help you share your worksheets and graphs with other people by exporting them to popular application formats, such as Microsoft Excel or HTML. In fact, because these two formats are so popular in the business world, Discoverer also provides shortcuts from the Toolbar and File menu to quickly export to Excel and HTML.

With the help of the Export Wizard, you can expect that what you see on screen appears as similar as possible in other applications. Exporting a worksheet exports its data; but depending on the type of format you choose, the exported worksheet may also contain its formatting and layout. However, exporting does not export Discoverer features, such as calculations and conditions. In other words, you can view the exported data in another application, but you cannot apply Discoverer features to it in that application.

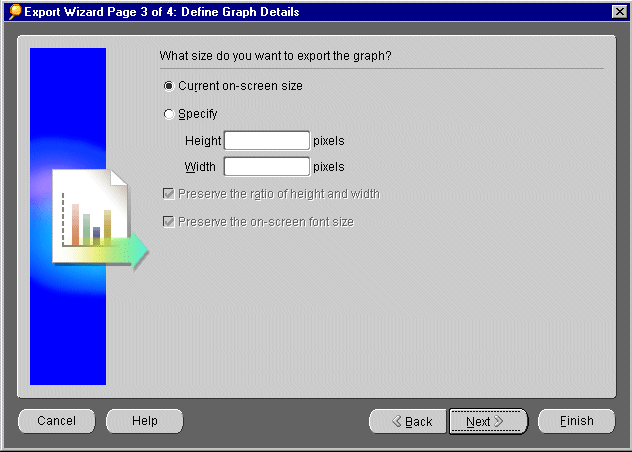
You can export a single worksheet, all worksheets in a workbook, and all graphs associated with any worksheets. Worksheets and their graphs export as separate files, one file for each worksheet in a workbook and one file for each graph. Note that the Export Wizard always exports graphs as GIF files, an image file format that is common on the Web and supported by many business applications. You can also choose to export graphs at different sizes. You can export the graph the same size that you see on screen or scale the graph larger or smaller.

If your worksheet contains Page Items, note that you can export exactly what you see on screen. To export other combinations of Page Items, first pivot the Page Items and then export your modified worksheet. To pivot Page Items, see "Pivoting Data". Also note that pivoting Page Items changes the content of your graph so that your worksheet and your graph match. Before exporting, look at your graph to verify that it contains the data that you want to export.

  1. Open the worksheet that you want to export.

  2. From the menu, choose File | Export to start the Export Wizard.

  1. Select which worksheets you want to export:

    • Current worksheet--exports the currently open worksheet.

    • All worksheets--exports all worksheets in the workbook.

  2. Choose what you want to export.

    • Both Graph and Table/Crosstab--exports the data and the graph.

    • Table/Crosstab only--exports the data.

    • Graph only--exports the graph.

  3. Click Next to move to page two of the Export Wizard.

  1. Select an export format from the pull down list. You can choose from many popular data formats, such as Microsoft Excel Spreadsheet (*.xls), Hyper-Text Markup Language (*.htm), Tab Delimited Text (*.txt), and others.

  2. Type the path to the location on your hard drive (or network drive) where you want to save this exported file. If you are unsure of the correct path, click the Browse button to browse to the location that you want.

  3. Click Next to move to page three of the Export Wizard.

  1. Select the size that you want to export your graph and font:

    • Current on-screen size--exports the graph the same size that you see on screen. If you resize the graph on screen first, this selection exports the current on-screen size.

    • Specify--exports the graph larger or smaller than what you see on screen. Type exact pixel dimensions for height and width; for example, Height 400 pixels and Width 600 pixels.

    • Preserve the ratio of height and width--if you specify the height for your graph, automatically set the width OR if you specify the width for your graph, automatically set the height.Preserve the on-screen font size--If you specify the exact height and width in pixels for your graph, this checkbox prevents the fonts from changing size.

  2. Click Next to move to the next page of the Export Wizard.

  1. Select whether or not you want to supervise the export process. Discoverer may occasionally give you alert messages to let you know that queries take a long time or that the database returns more data than the maximum set in the Options dialog's Query Governor tab (see "Setting Query Governor Options").

    • Supervised--select this option if you want to see these alert messages while exporting.

    • Unsupervised--select this option to ignore any alert messages while exporting. You can also add a checkmark to the checkbox Skip sheets with long running queries if you expect that some of the worksheets will take a long time to export and you don't want to wait. The Export Wizard exports the rest of the worksheets. You can export the slower worksheets later.

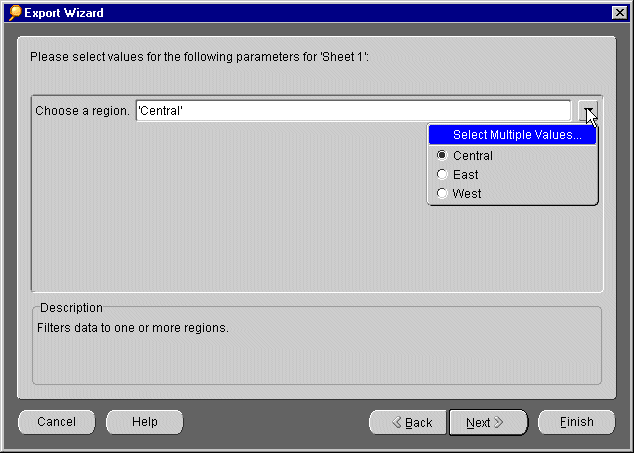
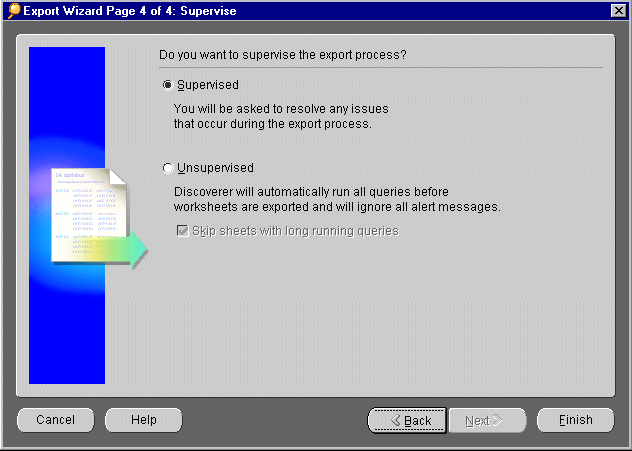
    Note: If the worksheets contains parameters, Discoverer will still ask you to choose values for the parameters whether you choose Supervised or Unsupervised.

  2. Click Finish on the Export Wizard dialog box. If the worksheet has parameters defined for it, the following dialog box appears. Click the drop-down menus and select the values for the worksheet's parameters.

  3. Click Finish.

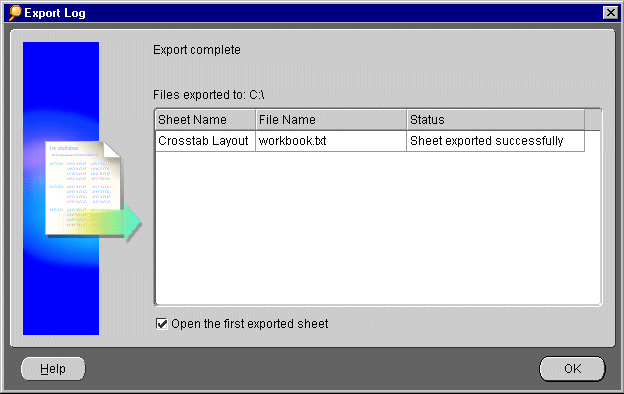
    The worksheets are saved in the new format in the directory you specified. Progress messages appear to let you know how the export process is proceeding. The Export Log then appears so you can check that all worksheets were exported successfully.


    1. Do one of the following:

      • To view the newly exported worksheets in their new format (for example, in Microsoft Excel or in your Web browser), click the checkbox, Open the first exported sheet.

      • To view the worksheets later, uncheck this checkbox.

    2. Click OK.

    Note: To export other combinations of Page Items on a worksheet, first pivot the Page Items (see "Pivoting Data".) Then from the menu, choose File | Export again. Repeat the export process for each combination of Page Items. Also note that pivoting Page Items changes the content of your graph. Before exporting, look at your graph to verify that it contains the data that you want.

    Exporting to Microsoft Excel and HTML Formats

    The Excel and HTML tools on the tool bar helps you quickly export Discoverer worksheets to Microsoft Excel format and HTML format.


    To quickly export to Excel
    1. Open the worksheet that you want to export to Microsoft Excel. Make sure that it contains the combination of Page Items that you want.

    2. From the menu, choose File | Export to Excel, (or click the icon on the toolbar).

      Depending on the browser you are using, the Download dialog appears.


    1. Select one of the options:

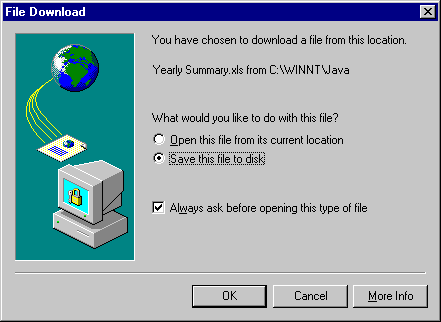
      Open this file from its current location-- the worksheet opens from the database as a Microsoft Excel spreadsheet (*.xls).

      Save this file to disk-- you can save the worksheet on your local hard disk as a Microsoft Excel spreadsheet (*.xls).

      If you deselect the option Always ask before opening this type of file, the Download dialog does not appear when you export a worksheet to Excel.

    2. Click OK. The worksheet is saved in Microsoft Excel spreadsheet format. If you selected the option to open the file from its current location, Excel launches to display the new Excel spreadsheet.


      To quickly save as HTML

    1. Open the worksheet that you want to export to HTML format. Make sure that it contains the combination of Page Items that you want.

    2. From the menu, choose File | Export to HTML, (or click the icon on the toolbar).

      Your worksheet is saved to your default file location (for example, the default file location on your hard disk) and is displayed in your browser.


Oracle
Copyright © 2000 Oracle Corporation.

All Rights Reserved.

Contents

Index