Release 4.1
Contents |
Index |
| Discoverer 4i Plus Online Help Release 4.1 |
|
Sorting arranges data into either alphabetical or numerical order. For example, a list of parts might be sorted by part number, and a list of customers might be sorted by last name. You normally sort alphabetic information (store names, customer names, and so on) into alphabetical order; you sort numeric information (sales figures, quantity of units sold, and so forth) into numerical order. In either case, you can sort the data from Low to High--which is A to Z or 1 to 10, or High to Low--Z to A or 10 to 1.
NOTE: Although examples in this section show sorting from A to Z, Discoverer sorts data according to the alphabetical sequence most appropriate for the language you selected to use with Discoverer. Please see your Discoverer Administrator about setting up the appropriate sort for your language.
Sorting is also helpful for analyzing data. For example, sorting sales data from most profitable sales to least profitable sales shows the your company's best selling products or the most effective salespeople. In addition to simple sorting, you can also sort data within data. For example, companies often use targeted mailing campaigns based on customer addresses in particular zip codes. You could sort the data by zip code, and then by address within the zip code.
Click to learn about:
Simple Table Sorting
Group Sorting
About the Sort Order
Sorting Data on Crosstabs
See also:
Pivoting Data
Drilling Into and Out of the Data
Duplicating Tables and Crosstabs
Adding Calculations to Worksheets
Totaling Numeric Data
Calculating Percentages
Choosing Font Options
You use the Sort dialog to select the data to sort and the sort order.
In the following example, the primary sorted data is Region, which is sorted alphabetically so the three regions appear on the table as Central, East, and West. Region is sorted Lo to Hi, which for text data is alphabetical from A to Z.
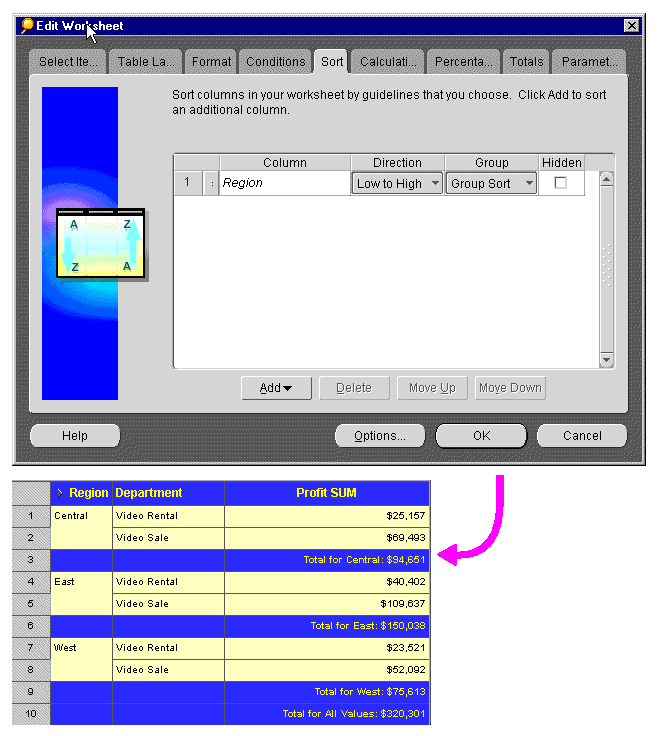
The Sort Table dialog box appears. It shows the sorting options currently selected for the table.
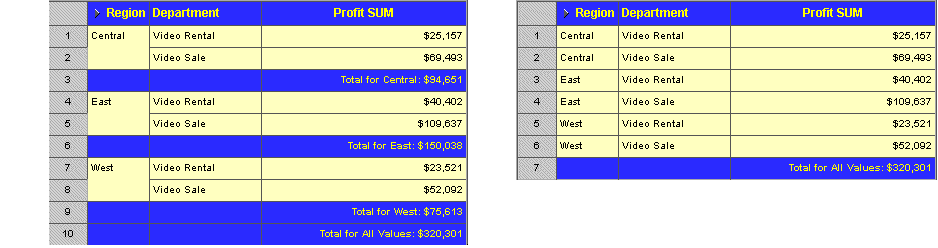
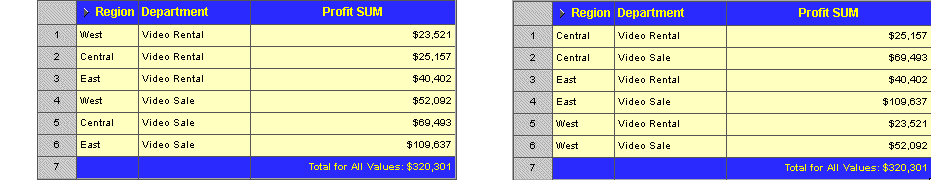
Applying group sorting displays each data value at the top row of a group. In the following figure the table on the left is group sorted by Region so the Region name only appears at the first city in the region. The table on the right is also sorted by Region, but is not group sorted. In this case the Region name appears next to each city name.
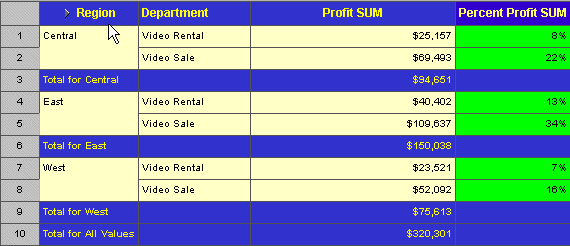
One key reason to sort data by groups is to find subtotals for groups of numerical data. See Section , "Creating a New Total" for steps to add subtotals and totals to data sorted by groups.
Group sorting is also pertinent when finding percentages. When you specify percentages for numbers (for example, the percentage of each region's profits of the total profits), the data is automatically group sorted for that section of data (e.g., the regions) so the percentages can be displayed properly. See the section, Creating a New Percentage, for more information.
NOTE: You can sort data by groups on table worksheets, but not on crosstab worksheets.
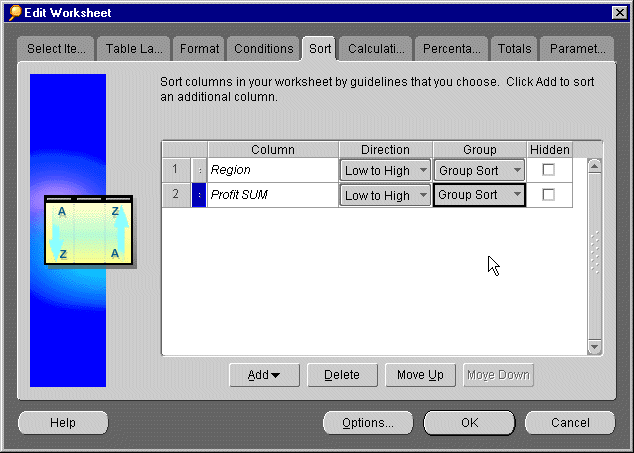
You can also sort data within the groups. The following sample shows data is first sorted by Region, and then within each Region group by Profit Sum from low to high. You can easily see the relative profit standings of each city.
The Sort Table dialog box appears. It shows the sorting options currently selected for the table. If you do not want to sort by that data item, click its column handle and click Delete.
Columns with Group Sort selected always precede those with no group sorting (Group="None") to assure that the sorting is done correctly on the table. If you move a column without group sorting above a column with group sorting, the column you're moving is automatically set to group sort. Similarly, if you move a column with group sorting below a column without group sorting, the column on top is automatically set to group sort.
The order of the columns on the Sort dialog is important because it affects how you can compare the data quickly based on the sorting. The order of the columns determines which data is sorted first, second, third, and so on. You can move the columns up and down to put them in the order that you want on the dialog box. To move a column up or down on the list, click the column's handle (just to the right of the column number) to select it. The pointer becomes an up/down arrow indicating you can move the selected column up or down in the order.
In the example below, the table on the left is sorted in Profit SUM, then Region. This enables you to see the Profit SUM figures in the order lowest first, highest last. In the table on the right, the sort order is Region, then Profit SUM. This enables you to compare Departments in the same Region.
Because the location of data on a crosstab determines the relationship of one data item to another, sorting crosstab data is somewhat different from sorting tabular data. In particular, you normally want to maintain those data relationships while rearranging the data.
The way to maintain the data relationships is to sort data on the left axis relative to a specific column on the top axis. Or, sort data on the top axis relative to a specific row on the left axis. The Sort Crosstab dialog automatically sorts the data in that manner and maintains the data relationships.
NOTE: Data on a crosstab layout is already sorted by default. Text items are automatically sorted alphabetically from A-Z and numbers are sorted from lowest to highest, but you can reverse the sort order.
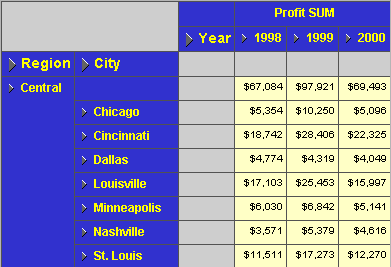
The following example illustrates a crosstab sorted by City (A-Z order) within Region (A-Z order).
The Sort Crosstab dialog offers a full range of options for sorting Crosstab worksheets.
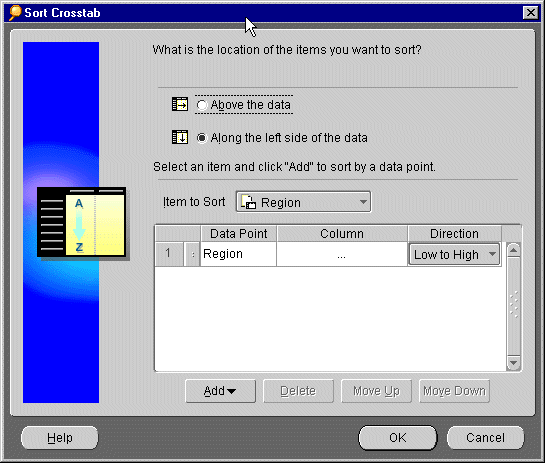
Above the data--shows the data items on the top axis.
Along left side of data--shows the data items on the left axis.
The Column drop-down list identifies the column that contains the data for sorting when sorting is based on data from the left side of the crosstab. The Row drop-down list identifies the row that contains the data for sorting when sorting is based on data from the top of the crosstab.
For example, after Region are sorted in the example shown above, you could repeat the process and sort by Cities. Being able to successively sort lets you create a crosstab that orders the data in precisely the way you want.
NOTE: After sorting a crosstab, the data on the top axis or left axis is reordered relative to the column or row you used for sorting.
Adding a data point to a crosstab sorting enables you to sort the data in some other arrangement. Added data points must always be the first item for sorting. This is because sorting items by data points makes logical sense, but sorting data points by items does not.
To illustrate this concept, it makes sense to sort the City item by the Profit data point because each City has a Profit amount associated with it. However, it does not make sense to sort Profit by City because each profit value has only one city associated with it. It would be like trying to sort the profit amounts by "New York" or "Phoenix," which doesn't make logical sense.
You can add the data point two or more times. This is useful with duplicate data points. In the example, if two cities had exactly the same amount of profit, you could specify how to sort those two duplicated pieces of data (low to high or high to low). This type of "sorting within sorting" on a crosstab is helpful for text or other data likely to have duplicate values. For financial data or other variable numeric items, however, sorting within sorting is usually not necessary.
|
|
 Copyright © 2000 Oracle Corporation. All Rights Reserved. |
|